
Table of Contents
- The Art of Creating a Diaper Tricycle
- Essential Supplies for Your Diaper Tricycle Masterpiece
- Step-by-Step Assembly Guide for Beginners
- Unique Personalization Ideas for Your Diaper Tricycle
- Gift-Giving Tips: Presenting Your Diaper Tricycle with Style
- Q&A
- Wrapping Up
The Art of Creating a Diaper Tricycle
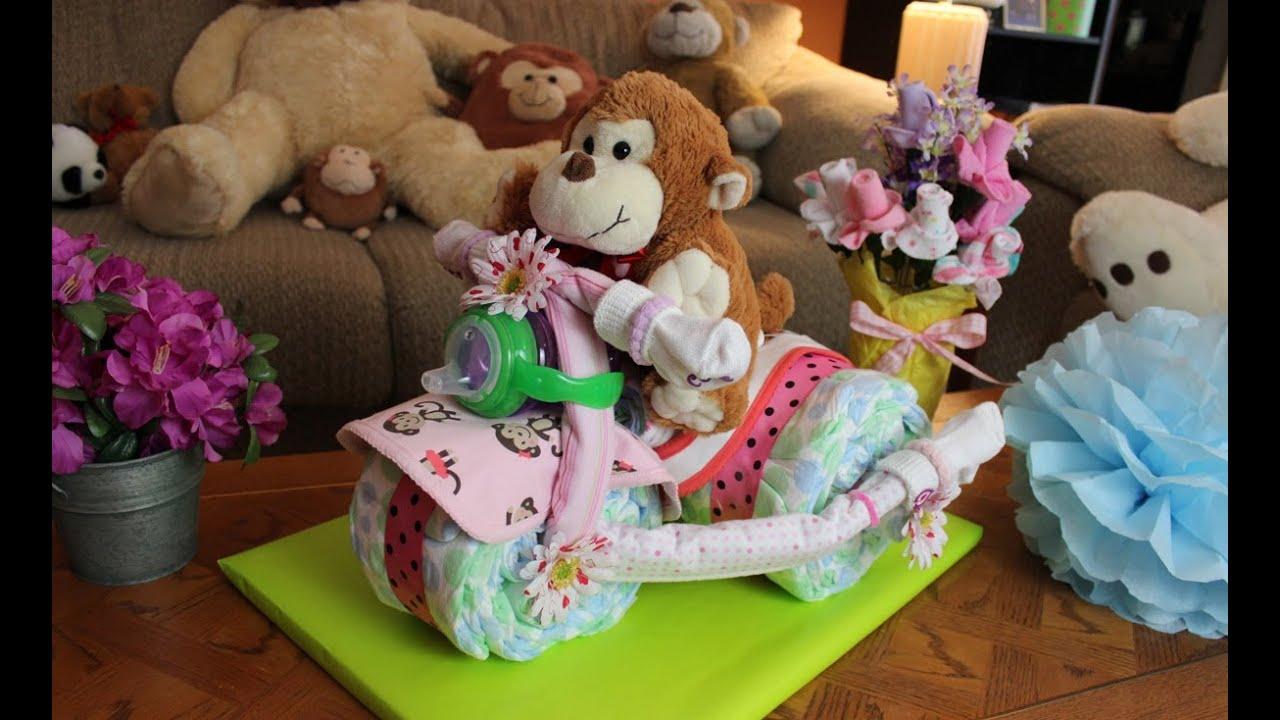
Creating a diaper tricycle is not only a fun and creative activity, but it also serves as an excellent gift for baby showers or welcoming new arrivals. Start with the essentials: gather a variety of diapers, colorful ribbons, a soft blanket for the seat, and some decorative elements such as baby toys or pacifiers. The diapers will form the “wheels” and “body” of the tricycle, so quickly rolling them up tightly will help in shaping the structure. Consider using small rubber bands to secure each diaper roll for stability.
Next, assemble the body of the tricycle. Begin by stacking three rolled diapers side by side to create the wheels. Use a large diaper or a soft blanket to create the base where the wheels will rest, helping to secure them in place. For the handlebars, choose a stylish baby bottle or a pair of rattles. Intertwining ribbons around the handlebars can add a personal touch and enhance the visual appeal. This stage allows you to truly express your creativity while ensuring the tricycle maintains a sturdy form.
add the finishing touches to make your creation stand out. Drape the tricycle with a lightweight cloth or lay a cute blanket across it to enhance its charm. For a personal flair, consider attaching a small tag with the baby’s name and birth date, making it a memorable keepsake for parents. Place small surprises like socks or bibs within the structure, turning the tricycle into a treasure chest of baby essentials. Your diaper tricycle will not only be an eye-catching centerpiece, but also a thoughtful and practical gift that parents will appreciate.
Essential Supplies for Your Diaper Tricycle Masterpiece
Creating a diaper tricycle requires not just creativity but also a selection of essential supplies that will bring your vision to life. Start with a solid foundation using diapers; pack them tightly to form the main body of the tricycle. Choosing quality, disposable diapers can ensure that your masterpiece holds its shape. Next, you’ll need ribbons and bows for added flair; colorful embellishments can enhance the aesthetic and make your tricycle a delightful centerpiece.
To craft the wheels, opt for round objects such as small paper plates, cardboard circles, or even jars, which can be decorated to mimic wheels. Consider using tissue paper or wrapping paper to add patterns and textures. Additionally, don’t forget to gather rubber bands, scissors, and adhesive for assembling the various parts. These tools are crucial for securing the diapers and attaching the decorative elements, ensuring your tricycle is both stable and visually appealing.
a dash of personalization can transform your project into a cherished gift. Incorporate baby items like pacifiers, bottles, or plush toys, which not only serve as decorations but also as functional keepsakes for new parents. By layering these supplies thoughtfully, your diaper tricycle can become an unforgettable addition to any baby shower. Below is a helpful table outlining the supplies and their purposes:
| Supply | Purpose |
|---|---|
| Diapers | Main structure |
| Ribbons & Bows | Decoration |
| Round Objects | Wheels |
| Tissue Paper | Textural embellishment |
| Rubber Bands | Assembly |
| Baby Items | Personalization |
Step-by-Step Assembly Guide for Beginners
Assembling a diaper tricycle might seem daunting at first, but breaking it down into manageable steps can make the process enjoyable. Start by gathering all necessary materials, including diapers, ribbons, a rubber band, and a soft toy for the front. Make sure to have a clean workspace where you can lay out everything comfortably. A simple checklist can help keep you organized:
- Diapers: Around 24 to 30 baby diapers (preferably size 1 or 2)
- Rubber bands: A few strong rubber bands to secure the diapers
- Ribbons: Colorful ribbons for decoration
- Toy: A small plush toy or stuffed animal for the handlebars
Once you’ve gathered your materials, start building the diaper tricycle. First, stack the diapers into groups of three and secure each group with a rubber band. Then, position these groups in a triangular formation to shape the tricycle’s wheels. Next, select a larger set of diapers for the seat by stacking them to create a solid base. Use rubber bands to hold these stacks together firmly. embellish your creation with ribbons, wrapping them around the diaper stacks and adding your soft toy to the front with a ribbon tie for that charming finishing touch.
For a clearer understanding, you may find this simple table useful in choosing the right materials:
| Item | Quantity | Purpose |
|---|---|---|
| Diapers | 24-30 | Body of the tricycle |
| Rubber Bands | 5-10 | Holding diapers together |
| Ribbons | 3-5 | Decoration |
| Soft Toy | 1 | Handlebar adornment |

Unique Personalization Ideas for Your Diaper Tricycle
Transform your diaper tricycle into a standout piece with unique personalization that reflects your style. Start by incorporating color themes that match the nursery or the baby shower theme. Choose vibrant ribbons and bows that complement the diaper arrangement. You can also use fabric markers to add fun and whimsical designs on the tricycle’s frame or tires. Consider attaching personalized name tags, which can be crafted from cardstock and decorated with baby-themed stickers.
Another imaginative approach is to include themed decorations that resonate with the interests of the parents or the baby. For instance, if the parents love a certain show or character, like animals or superheroes, integrate small plush toys or figurines onto the tricycle. You could even create mini bunting flags that say something special, like “Welcome Baby!” or “Oh, What Fun!” This not only adds a personal touch but also enhances the visual appeal, making the diaper tricycle a centerpiece at any event.
Lastly, think about adding practical items with a bit of flair. Fill the tricycle basket with items like personalized bibs, onesies, or blankets that can be customized with the baby’s name or initials. A creative way to present these items is by rolling them up into ‘tires’ and stacking them in place of traditional diapers. Here’s a quick table to summarize the potential personalization options:
| Personalization Idea | Description |
|---|---|
| Color Themes | Use ribbons and bows to match the nursery or shower theme. |
| Themed Decorations | Incorporate plush toys or mini bunting flags that reflect interests. |
| Practical Items | Fill the basket with personalized clothing or blankets. |

Gift-Giving Tips: Presenting Your Diaper Tricycle with Style
When it comes to presenting a diaper tricycle, creativity can take your gift to the next level. First impressions matter, so consider wrapping it in a delightful baby-themed blanket instead of conventional gift wrap. This not only enhances the visual appeal but also adds a practical element that new parents will appreciate. Pair it with a colorful ribbon that matches the blanket to create a cohesive look. Don’t forget to attach a personalized gift tag, making your presentation even more special.
Next, consider adding extra items that complement the diaper tricycle. Little touches can include:
- Diapers of various sizes
- Baby wipes in a decorative container
- A soft plush toy for added charm
Lastly, think about the setting where you will present the gift. If possible, showcase the diaper tricycle at a baby shower or a welcome-home gathering. Consider creating a small display table adorned with pastel-colored balloons and baby-themed décor. You could even create a simple table with WordPress styling to highlight your thoughtful gift, as shown below:
| Item | Description |
|---|---|
| Diaper Tricycle | A unique and functional gift for new parents. |
| Soft Toy | A cuddly companion for the baby. |
| Baby Wipes | A must-have for diaper changes on the go. |


0 Comments